Install Production Component Driver
The Configuration Item component driver is only available if your Deltanji license includes the Component Driver: PRI option.
WARNING: If you install a license key that permits use of this component driver but do not intend to start using it right away then you may wish to configure the CLS component driver to continue to operate in monolithic mode until you are ready to make the transition. See the section below, Monolithic Mode, for details of how to do this.
Run The Installation Script
If your original license key included the PRI component driver then you will have already performed this step during the initial installation of Deltanji.
If you have upgraded your license to include the PRI component driver then follow the instructions here to re-run the installation script. This will enable the PRI component driver and ask you to choose between a server-side or client-side installation of the Production Client Integration.
NOTE: If you choose the option to install the Client Integration on the server-side then the installation script will need to modify and recompile a class in the ENSLIB database. For this it will need the following permissions: %Admin_Manage, %DB_IRISSYS and %DB_ENSLIB. Role %All or role %Manager plus %DB_DELTANJI and %DB_ENSLIB have sufficient permissions to perform this action.
If you choose the client-side option then you should carry out the Install Production Plugin (Client-Side) steps described below before continuing with the rest of the instructions here.
Configure Web Applications
For automatic authentication the Web Application definitions for both the IRIS Production Configuration page and the Deltanji Portal must be hosted on the same server and share the same cookie path.
If Deltanji is hosted on a different machine then you will need to create a local web application on your development server which is associated with the DELTANJI-LOCAL namespace that has its %vc* globals mapped via a remote database to the central Deltanji server.
Typically the IRIS Production Configuration page is served from a web application
named /csp/<namespace>
or /csp/healthshare/<namespace>, and the Deltanji Portal is usually served from a web application
named /deltanji.
Complete the following steps:

1. In the IRIS Portal navigate to System > Security Management > Web Applications.
2. Locate the Session Settings for the /deltanji web application and change the session cookie path to /.
3.
For each namespace where you will use the Production Configuration page locate the
web application
named /csp/<namespace> or /csp/healthshare/<namespace> and change
its Session Cookie Path to /.

Enter Deltanji URL
When each user first uses the Deltanji Production plugin on the Production Configuration page of the IRIS Portal they will be presented with a grey source control icon in the top left corner of the settings panel.
When this icon is clicked the user will be prompted for the URL of the Deltanji instance. This is the same URL that is used to access the main Deltanji Portal. You can simply copy this URL from the address field in your browser. It will normally be something like http://server:57772/deltanji/Client.VCm.cls.
Having entered the URL for Deltanji the plugin will connect to the Deltanji server. Using component status information it will decorate the Production Configuration page with the status of the production class and each of the configuration items.
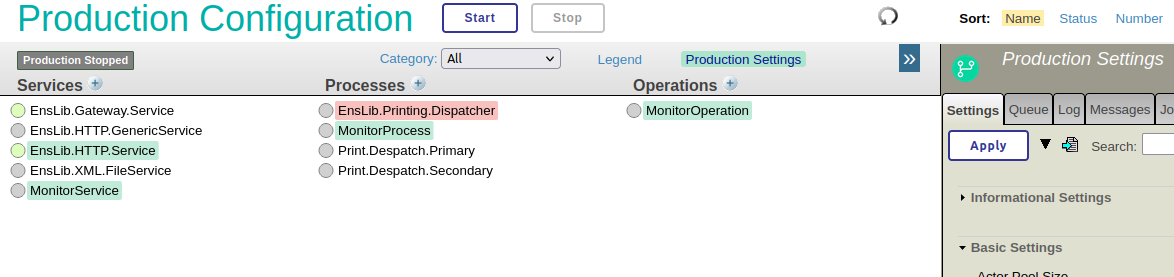
Should you need to change the URL for any reason, for example if the address of the Deltanji server changes, then you can do this by ctrl+click on the Deltanji icon.
If Deltanji is hosted on the same server as the IRIS instance where development is performed, and if Deltanji authentication is configured to use your IRIS user account, and if both the Web applications for IRIS and Deltanji share the same cookie path, then you will not require a separate login step. Deltanji will be authenticated automatically.
If Deltanji is hosted on a separate server then automatic authentication requires an additional CSP application to be defined on the development machine.
Exclude Production Configuration Page from Source Control
In order to use the Production Plugin to manage Configuration Items it is necessary to disable normal class based source control for the Production Configuration page. This needs to be done once for each namespace where you want to use the Plugin. The following steps explain how to do this:
1. Launch the Management Portal.
2. Navigate to: Interoperability > Manage > Configuration > Interoperability Settings
3. Check the box labeled Exclude Production Configuration Page from Source Control and click Apply.
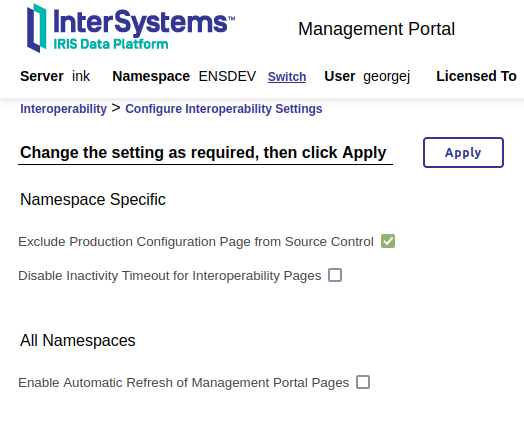
4. Repeat the above steps for each namespace where you intend to make Deltanji-controlled changes to Production Configuration Items.
Configure Transfer Defaults
When a transfer is initiated by clicking the Deltanji source control button on the Production Configuration screen the standard Deltanji Transfer screen will be presented. The Function, From and To Location fields will be defaulted based on the status of the selected item. The values that are defaulted can be configured to suit your workflow.
This can be done for each namespace by using the Deltanji Configuration Add-In that is provided in IRIS Studio. Launch IRIS Studio and from the main menu navigate to Tools > Add-Ins > Add-Ins… and select the item named Deltanji Configuration (VCmStudio). Fill in the section titled Transfer Routes for Source Control Operations providing appropriate values for each operation.
Initial Component Registration
If you have productions that are have already been deployed before you first enable the Production component driver, then you will need to ensure that configuration items are marked as active in any deployed locations when they are initially registered with Deltanji. If you don’t do this then you will get the error message that the component "exists at destination but is not registered to Deltanji".
Suppose you are registering configuration items in an environment named AppDev that are already present in the AppTest and AppLive environments. When you register the item in AppDev the take-on transfer route should activate the component in all three locations. For example:
Monolithic Mode
If you used Deltanji to manage production classes before you enabled the Production component driver then old versions of your production classes will contain settings for all configuration items. Once the Production component driver has been enabled these configuration items will become inaccessible.
Transferring older versions of your production classes will only transfer the production settings and class methods. Configuration items contained in those older versions will not be transferred.
Should you need to access these items, for example to revert to an older version of your production that was current prior to enabling the Production component driver, then you can temporarily revert to monolithic mode. Care should be taken while operating in monolithic mode as there is no protection against overwriting configuration items that are being managed using the Production component driver. In particular, if you transfer a version of a Production class that was created in non-monolithic mode then it will not contain any configuration items and will delete all configuration items in the destination location.
To enable to monolithic mode: set ^%vcct("CLS","settings","monolithic")=1
And to disable monolithic mode: set ^%vcct("CLS","settings","monolithic")=0
While monolithic mode is enabled it is still possible for configuration items to be created and managed using the Production component driver. Monolithic mode only affects the behavior of Production classes. However it is recommended that care is taken if you do enable monolithic mode and use of this mode should be for as short a time as possible.
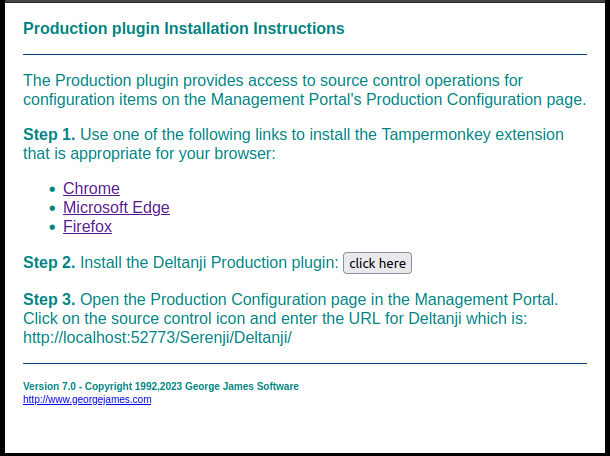
Install Production Plugin (Client-Side)
To install the Production Plugin in your web-browser follow this procedure. This procedure must be carried out for each user’s web-browser and should only be used if you cannot install the plugin on the server-side using the procedure described above.
1. Launch the Deltanji Portal.
2. Navigate to Help > Install Production Plugin…
3. Follow the instructions given to install Tampermonkey and then the Deltanji Production plugin.